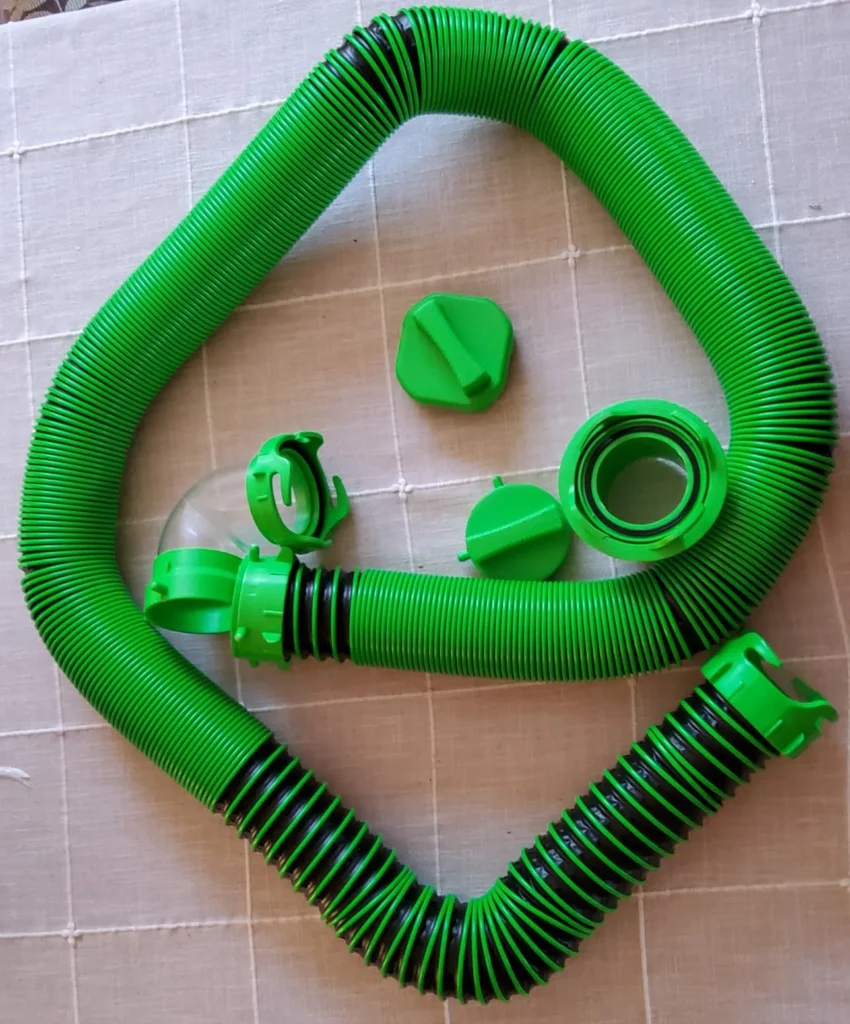
I check Camper Sewer Hose Fittings at three connection points: the RV waste outlet, the hose ends, and the approved campground sewer inlet. Most U.S. travel trailers, fifth wheels, and motorhomes use a nominal 3-inch bayonet-style outlet, but that standard doesn’t make every fitting compatible.
Rather than trust a “universal” label, I check the connection style, locking tabs, gasket condition, and hose attachment method. This guide explains those checks, shows how to arrange a supported downhill hose run, and outlines how to investigate leaks while minimizing spill risk.
What Are Camper Sewer Hose Fittings?
Camper sewer hose fittings are the connectors that form a closed path from an RV’s waste outlet to an approved sewer inlet. Some attach to the RV, some join hoses, and others seal the hose at the dump station.
The fittings do not control tank flow. That is the job of the RV’s dump valves. A secure fitting can still leak if its gasket is worn, its body is cracked, or the hose pulls it out of line.
The Main Types and Their Jobs
Use this table to identify the part you need before you buy a replacement.
| Fitting | Main job | What to check |
|---|---|---|
| RV-end bayonet connector | Locks the hose onto the RV waste outlet | Lug pattern, locking hooks, gasket, and clearance |
| Hose coupler or extension connector | Joins two sewer hose sections | Matching ends and a sound seal |
| Sewer elbow or outlet adapter | Directs waste into the campground inlet | Inlet size, connection style, and available space |
| Threaded sewer adapter | Secures an elbow to a compatible threaded inlet | Exact thread fit and campground requirements |
| Nonthreaded sewer seal | Seals a compatible smooth inlet | Inlet shape, adapter fit, and site approval |
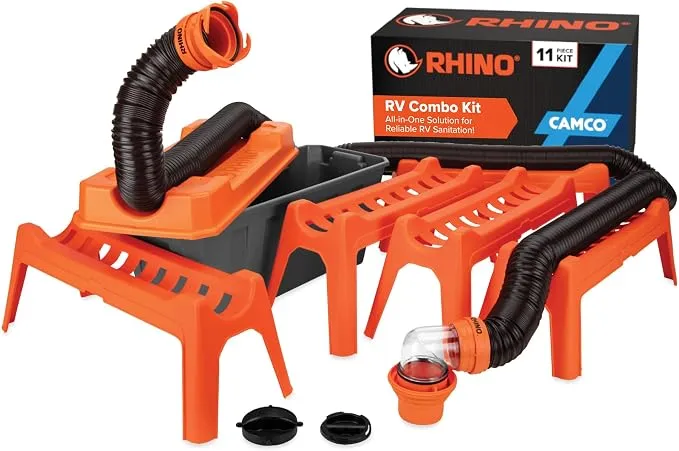
| Clear elbow or straight adapter | Lets you see flow during dumping and rinsing | Connection fit, added length, and ground clearance |
| Storage cap | Covers a disconnected hose end | Matching connection and intended use |
| RV termination cap | Covers the RV waste outlet | Correct seal and locking fit |
A clear adapter can help you see when flow slows or rinse water clears. It does not prove that a tank is empty, clean, or free of a blockage.
How to Check Sewer Hose Fitting Compatibility
Check the whole connection, not just the stated diameter. “3-inch” describes a nominal RV waste connection size; it does not mean that every nearby surface, thread, or hose collar has the same dimensions.
The easiest way to avoid a mismatch is to photograph both ends of the existing hose and the RV outlet. Keep the hose brand, model, and part number if you can find them.
1. Identify the RV Outlet
A common RV outlet has projecting lugs. The mating hose connector has hooks or slots that engage those lugs when you turn the connector.
Look for:
- Broken or worn lugs.
- Cracks around the outlet.
- A gasket in the mating connector.
- Enough space to turn the connector without striking a valve handle or the RV body.
If the outlet has an unusual shape or an added adapter, check the RV manual before ordering parts.
2. Check How the Fitting Attaches to the Hose
The RV-side bayonet connection and the hose-to-fitting connection are different interfaces. A fitting may lock onto the RV yet fail to attach to your hose.
Some hose fittings use clamps. Others use threaded collars, locking rings, or factory-installed ends. Replace them only with parts approved for that hose design.
Do not force a fitting onto a hose because both are labeled 3-inch. A poor hose-end joint may pull apart once the hose fills with waste.
3. Inspect the Gasket
The gasket forms the seal. The locking hooks hold the parts together and compress that seal.
Replace a gasket that is split, missing, badly flattened, or no longer seated in its groove. Use the specified replacement shape and material. A similar-looking plumbing washer may not seal correctly.
4. Match the Campground Inlet
U.S. campground sewer inlets vary. Some accept threaded adapters; others need an approved nonthreaded seal. A site may also require a specific type of sealed connection or hose support.
A multi-size adapter gives you more options, but it does not guarantee a fit at every park. Ask the campground what its inlet accepts if the connection is unclear.
Which Fittings Do You Actually Need?
For a basic gravity-drain setup, you need a secure RV connection, a sound sewer hose, and an adapter that seals at the receiving inlet. Add parts only when they solve a real fit, reach, or handling problem.
Every extra joint is another seal to check. A short, well-supported setup is often easier to inspect than a long chain of adapters.
| Your situation | Useful fitting or accessory | Main trade-off |
|---|---|---|
| Standard outlet and nearby dump inlet | Matching hose assembly and sewer adapter | Simple setup, but limited reach |
| Sewer inlet beyond one hose length | Compatible extension hose or coupler | More reach adds a joint and more hose to drain |
| Outlet is hard to see | Clear elbow or straight adapter | Better view, but less clearance in some layouts |
| Outlet angle strains the hose | Suitable elbow or swivel fitting | Less strain if positioned well; added length may create a low spot |
| Replacement hose fitting is needed | Part specified for that hose | A generic fitting may not secure the hose correctly |
| Macerator system is installed | System-specific discharge fittings | Standard gravity-hose parts may not be suitable |
A swivel fitting lets the hose turn without loosening the bayonet connection. That can make alignment easier, but the swivel seal still needs inspection.
Choose hose length based on the route to the inlet, not just the straight-line distance. Too little hose pulls on the fittings. Too much hose creates loops that can hold wastewater.
How to Connect and Use Camper Sewer Hose Fittings
Connect both ends securely before opening a dump valve. Wear disposable gloves, keep fresh-water gear away from sewer gear, and follow the RV manual and dump station rules.
Before you start, have a sound hose, the correct inlet adapter, a hose support if needed, and a way to wash your hands. Do not use a fresh-water hose for sewer cleanup.
1. Position the RV and Inspect the Route
Park so the hose reaches without stretching. Avoid sharp bends, vehicle paths, and points where the hose could rub against a sharp edge.
Set the parking brake and secure the RV as needed. Keep children and pets away from the work area.
2. Confirm That the Dump Valves Are Closed
Check the black- and gray-water valve handles before removing the outlet cap. Stand to one side as you loosen it.
Some residual liquid can remain behind the cap. If liquid continues to escape with the valves closed, stop. A valve may be leaking or may not be fully shut.
Do not treat the cap as a substitute for a working dump valve. Have a persistent valve leak checked before normal use.
3. Connect the Hose to the RV
Check that the gasket is present, clean, and seated. Align the connector with the outlet lugs, then turn it until it locks as the fitting maker directs.
Do not use tools for extra leverage unless the manufacturer calls for them. Excess force can damage plastic tabs or the outlet.
4. Secure the Campground End
Fit the sewer adapter to the approved inlet. Thread a compatible adapter by hand, or use the correct nonthreaded seal where permitted.
Do not leave the hose loosely pushed into an opening. Keep the inlet covered or connected as the site requires, and never reach into a sewer opening.
5. Support the Hose
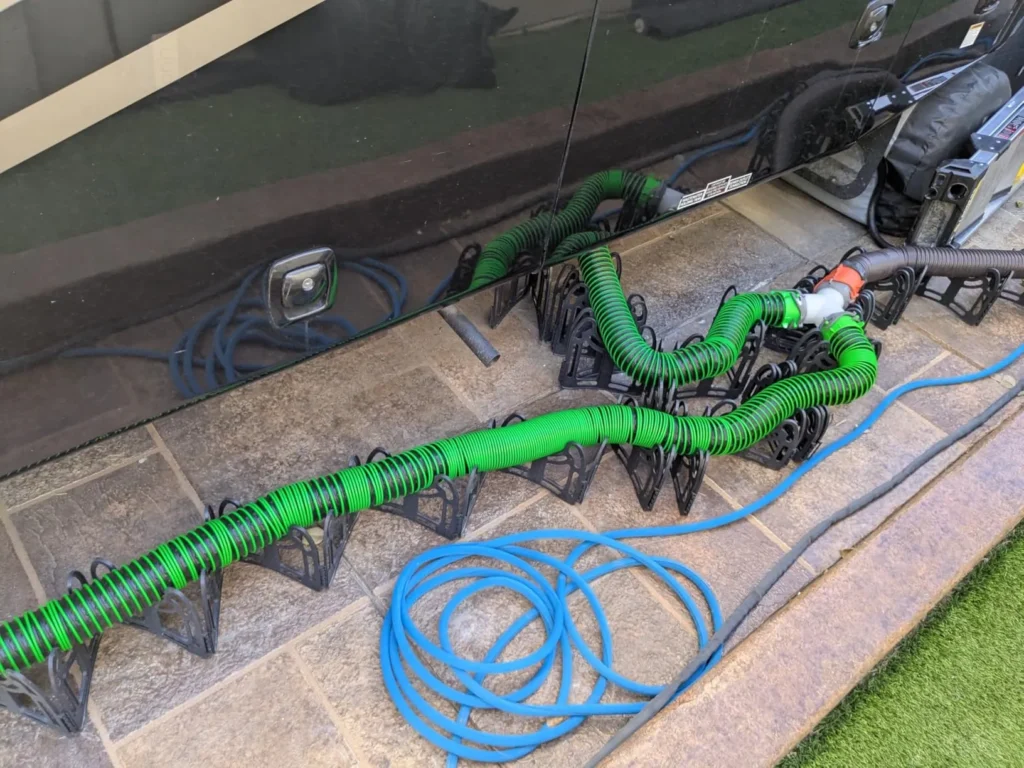
Arrange the hose so it drains toward the inlet without deep dips. Use a stable support where needed or required.
Think of a low spot as a pocket that traps wastewater. Shortening the hose or changing the support often works better than adding another fitting.
6. Dump in the Order Your RV Manual Specifies
For a typical gravity-drain system, empty the black tank first, close its valve, then empty the gray tank. Gray water helps move residue through the shared hose, but it does not disinfect it.
During an RV stay, keep the black-tank valve closed between dumps unless the system manufacturer directs otherwise. Leaving it open can let liquid drain away while solids remain.
If the RV has a tank-flush system, follow its instructions exactly. Never leave it running unattended or assume its operating steps match those of another RV.
7. Drain, Disconnect, and Store
Close the dump valves when dumping is complete. Let the hose drain toward the sewer, then follow the station’s rinse rules.
Keep the sewer end connected while you drain any remaining hose contents. Replace the RV termination cap, cap the drained hose ends, and store sewer gear apart from drinking-water items.
Remove your gloves and wash your hands with soap and water. Gloves reduce contact; they do not replace handwashing.
Signs the Setup Is Working
A sound setup stays locked, shows no seepage, and lets the hose drain without sharp kinks or deep pools. The fittings should not carry the weight of a long, unsupported hose.
If a joint leaks or starts to separate, close the dump valve first. Do not try to take apart or force-tighten a connection while waste is flowing.
How to Troubleshoot Leaks, Odors, and Poor Flow
Start by closing the dump valves and locating the exact fault. A leak at a bayonet joint needs a different repair from a leak where the fitting grips the hose.
Use the checks below in order. Inspect and repair only after the line has drained and the parts can be handled safely.
| Symptom | Possible causes | First useful check | Next step |
|---|---|---|---|
| Leak at the RV connection | Missing gasket, dirt, partial engagement, cracked fitting | Inspect the gasket and locking surfaces | Clean, reseat, or replace the damaged part |
| Leak where the hose enters a fitting | Loose approved clamp, damaged hose, wrong fitting | Check the hose-end assembly instructions | Reassemble correctly or replace it |
| Leak between hose sections | Incompatible ends or worn seal | Check both connectors and the gasket | Use matching parts with an intact seal |
| Seepage at the sewer inlet | Poor fit, cross-threading, wrong seal | Remove and inspect the adapter | Use the correct inlet connection |
| Hose keeps liquid in low spots | Excess length or uneven support | Trace the full hose route | Shorten or support the hose |
| Little or no flow with a valve open | Kink, blocked hose, valve fault, or tank blockage | Inspect the visible hose route | Stop if the cause is not clear; seek RV service |
| Odor persists with no visible leak | Residue, inlet seal fault, or another RV plumbing issue | Check hose drainage and inlet seal | Inspect the wider waste system if odor remains |
If the Fitting Will Not Lock
Stop and check alignment, dirt, gasket position, and part compatibility. A tight connection is not always the right connection.
Do not trim locking hooks, file down lugs, or use a wrench to force a mismatch. Replace the wrong or damaged part.
If a Clear Adapter Shows No Flow
No visible flow can mean the tank is empty, but it can also mean there is a blockage or valve problem. Tank level readings alone may not settle the issue.
Do not disconnect the hose to find out whether the tank is full. Do not apply compressed air or improvise a pressure-clearing method. A suspected blockage or failed valve is a reason to consult the RV manufacturer or a qualified RV technician.
Maintenance, Replacement, and Common Mistakes
Inspect sewer fittings before each trip and when you set up. Replace cracked bodies, broken locking parts, and seals that no longer seat well.
Clean parts using the fitting maker’s directions. Let them drain and dry where practical before storage. Use lubricant only if the manufacturer approves it for the gasket and fitting materials.
Avoid These Costly Errors
- Using thread tape on a bayonet joint. The gasket makes that seal; tape does not replace it.
- Forcing plastic threads. Cross-threading can damage both the adapter and the inlet.
- Using household drain cleaner. It may harm system parts and create a chemical exposure risk.
- Hanging the hose from the connector. Support the hose so its weight does not pull on the joint.
- Treating gray water as clean water. It still contains waste and should go only to an approved disposal point.
- Relying on a tape patch. Replace a damaged fitting or hose rather than making a temporary patch part of the normal setup.
Do not leave connected fittings exposed to vehicle traffic or freezing conditions. Ice can block drainage and damage parts. Follow the RV and hose manufacturers’ cold-weather guidance.
FAQs
Can I Leave the Sewer Hose Connected at a Full-Hookup Campsite?
Usually, if the campground allows it and the setup remains secure. Keep the inlet sealed and protect the hose from traffic, lawn equipment, and freeze damage. A connected hose does not mean the black-tank valve should stay open.
Is a Storage Cap the Same as an RV Termination Cap?
Not necessarily. A storage cap closes a disconnected hose end, while a termination cap covers the RV waste outlet. Check the maker’s stated use and connection type rather than assuming the caps are interchangeable.
Can I Dump an RV Into a Home Sewer Cleanout?
Only after confirming that the disposal point is approved for that use. Ask the local wastewater utility or other authority; for a septic system, also consult a qualified septic professional. A visible cleanout is not automatic permission to dump.
Do Macerator Systems Use the Same Fittings?
Not always. A macerator grinds and pumps waste through a discharge hose, which differs from a standard gravity sewer hose. Use the pump manufacturer’s specified hose, fittings, and operating procedure.
Should I Use a Gasket Sealant to Stop a Leak?
Not unless the fitting manufacturer specifically calls for it. These connections generally depend on a correctly seated gasket. Sealant can hide damage, complicate repairs, or affect materials without fixing the cause.
Sources, Research Scope, and Next-Question Map
This guide covers common U.S. gravity-drain RV waste systems. Live browsing and hands-on testing were not available for this article, so current product specifications, local rules, and competing pages were not independently checked. No brand-specific compatibility or performance claim is implied.
Use these primary-source starting points to verify details before buying or making a system-specific repair:
- Camco — product instructions and fitting specifications for the exact model.
- Valterra — RV waste-system parts and model-specific compatibility information.
- Lippert Support — documentation for applicable RV components.
- CDC handwashing guidance — hand hygiene after handling contaminated equipment.
- EPA septic system care guidance — septic-system limits and care; not blanket approval for RV dumping.
The following questions are inferred from the setup and repair task, not verified search-demand data. Competitor coverage is marked “not checked” because no competing pages were inspected.
| Next question | Reader stage and basis | Competitor coverage | Reader benefit and evidence needed | Priority and placement |
|---|---|---|---|---|
| Will this replacement attach to my hose? | Before purchase; inferred fit risk | Not checked | Avoid a mismatch; exact hose and fitting manuals | High; compatibility section |
| Why does a locked joint still leak? | During use; inferred seal fault | Not checked | Separate gasket failure from lock failure; fitting instructions | High; troubleshooting section |
| What if waste escapes with the valves closed? | Before hookup; inferred safety need | Not checked | Recognize a valve fault; RV service guidance | High; hookup procedure |
| Can I dump at home? | After travel; inferred disposal need | Not checked | Avoid an unapproved discharge; local authority and septic guidance | High; FAQ |
| Will this work with a macerator? | Before purchase; inferred system difference | Not checked | Avoid using gravity-drain parts in the wrong system; pump manual | Medium; FAQ |
Conclusion
Choose camper sewer hose fittings by checking the RV outlet, hose attachment, gasket, and receiving inlet as separate parts of one system. A nominal 3-inch label is a useful starting point—not a complete compatibility check.
Before your next trip, inspect the fittings you own and record the hose model. Replace damaged parts, test the fit with the dump valves closed, and keep the hose supported. If a valve leaks or flow stops for no clear reason, stop and get qualified help rather than forcing the connection.