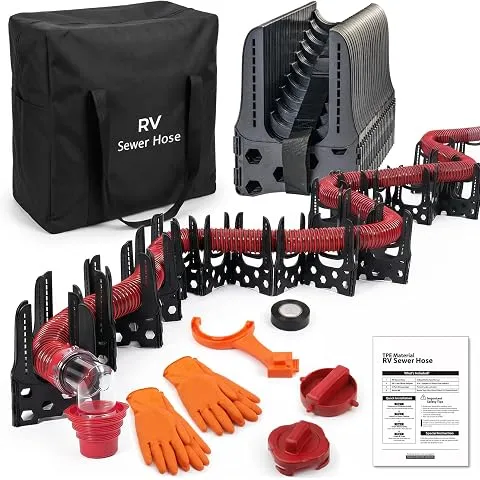
I choose an RV Sewer Hose Kit by checking three things first: compatibility with my RV’s waste outlet, enough reach to the campground drain, and room for storage. A suitable setup needs a waste hose, secure RV-end fittings, and an adapter that fits the approved sewer inlet—not just extra hose length.
For a conventional gravity-drain system, I focus on secure connections, sound seals, and proper support to maintain a downhill path to the drain. In this guide, I explain which components to look for, outline safe tank-dumping steps, and cover what to check if flow stops or a fitting leaks.
What Does an RV Sewer Hose Kit Include?
An RV sewer hose kit combines the hose and fittings needed to move holding-tank waste into an approved sewer system. “Kit” does not mean every box contains the same parts, so check the contents before you buy.
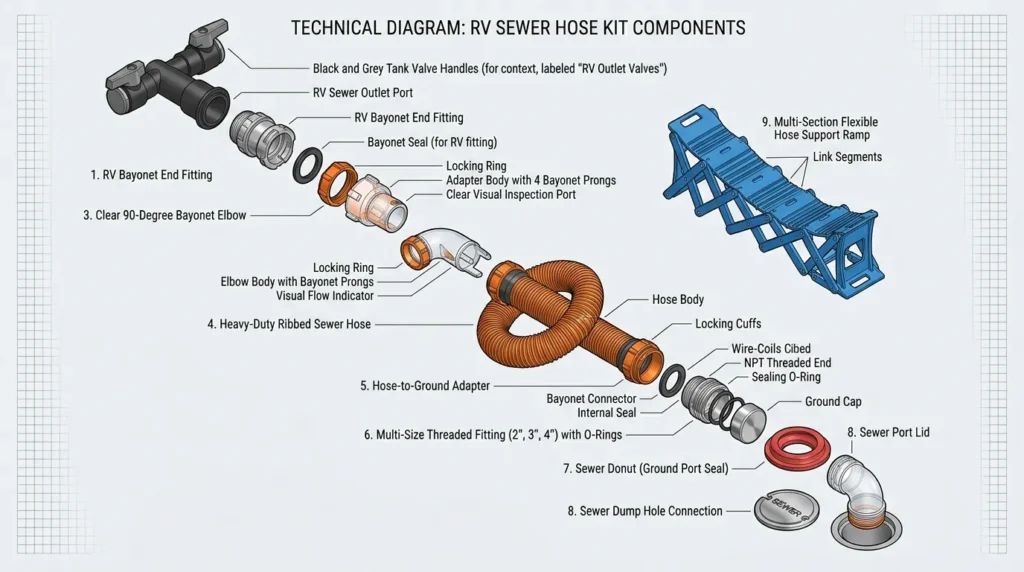
These are the main parts and their roles:
| Part | What it does | What to check |
|---|---|---|
| Sewer hose | Carries waste from the RV to the drain | Extended length, compressed size, and condition |
| RV-end connector | Attaches the hose to the RV waste outlet | Bayonet fit, locking tabs, and gasket |
| Sewer adapter or elbow | Connects the hose to the receiving inlet | Fit with the inlet’s threads or required seal |
| Coupler | Joins hose sections | Compatibility with both hose ends |
| End caps | Close hose ends for transport | Whether they are included and fit securely |
| Clear fitting | Lets you see the discharge | Clearance beneath the RV and at the inlet |
Many U.S. RV gravity-drain systems use a nominal 3-inch waste connection with bayonet-style fittings. That is a common arrangement, not a guarantee that every hose and adapter will fit every RV. Check your owner’s manual, outlet, and intended kit before purchase.
A macerator system is different. It uses a pump and a discharge hose specified for that system. Do not assume a standard gravity sewer hose kit can replace its parts.
“To compare hose lengths, fittings, and storage options, I recommend exploring my Best RV Septic Hose guide.”
Black water and gray water are different—but both need care
Black water comes from the toilet. Gray water comes from sinks and, in many RVs, the shower. Some rigs have more than one gray tank or more than one waste outlet.
Treat both waste streams as contaminated. Gray water can contain food residue, grease, soap, and microbes. Discharge it only where the site permits; do not assume it can go onto the ground.
How to Choose the Right RV Sewer Hose Kit
Choose a kit that fits your connections and reaches the inlet without strain or a large pile of excess hose. Then compare storage size, seal access, and repair options.
Check the connections first
Inspect the RV outlet for damaged tabs, cracks, or a worn sealing surface. Confirm whether your rig has one outlet or separate outlets for different tanks. Two outlets may require moving the hose between dumps or using a compatible arrangement designed for that purpose.
At the receiving end, campground sewer inlets vary. A multi-size threaded adapter can help with several inlet types, but it will not fit every site. Follow the campground’s connection rules and never force mismatched threads.
Choose length for the actual route
Measure the route the hose must follow—not just the straight-line gap. Allow room for fittings and a gentle route around fixed parts. Avoid stretching the hose tight.
The table below shows how length affects use. These are selection examples, not universal buying rules.
| Situation | Useful approach | Main trade-off |
|---|---|---|
| Inlet close to the RV outlet | Use a short hose section | Less reach if the next site differs |
| Site layouts vary | Use compatible sections that join when needed | Each added joint needs inspection |
| Long route to the drain | Check whether gravity drainage is practical | More length can mean more sag and trapped waste |
| Small storage bay | Check compressed size and fitting width | The end fittings may limit fit more than the hose |
Hypothetical example: A 13-foot route cannot be served by a hose whose listed maximum extension is 10 feet. A longer hose or compatible extension is needed. Yet a 20-foot hose is not always better for a short route; unused length can form low spots.
Judge construction by useful details
Look for intact reinforcement, secure end fittings, accessible seals, and a hose that can be stored without sharp bends. A crush-resistant design may help with minor knocks, but it does not make a hose safe to drive over.
Manufacturer terms such as “heavy duty” are not a shared performance standard. Without comparable test methods, they do not prove that one kit lasts longer than another.
Budget for the parts outside the box
A hose kit may still need:
- A support that maintains a downhill path.
- Disposable gloves and access to soap and clean water.
- A dedicated rinse hose kept separate from drinking-water gear.
- A washable storage bin or suitable exterior compartment.
- Replacement seals specified for the fittings.
Buy these based on the kit contents and your RV’s layout. A low kit price can lose its value if the required adapter or support is missing.
How to Connect and Use an RV Sewer Hose Kit
Connect and check the full drain path before opening a tank valve. For a typical gravity system, dump black water first, then gray water, unless your RV’s instructions require a different sequence.
Your owner’s manual and the dump station’s posted rules take priority over a general guide.
Before you begin
Park where the outlet can reach the inlet without stretching the hose. Secure the RV as directed in its manual, put on gloves, and keep children and pets clear.
Confirm that:
- Both waste valves are closed.
- The receiving drain is an approved sewer inlet.
- The hose, seals, and fittings have no visible damage.
- The hose can run downhill without deep sags.
- You have a permitted way to rinse and clean up.
A low spot acts like a small basin. It can hold waste after the tank stops draining, which makes disconnection less predictable.
1. Check the RV outlet cap
With the valves closed, place suitable containment beneath the outlet and loosen the cap cautiously. A small amount of trapped liquid may remain behind it.
If substantial waste appears or continues to seep, stop. A valve may be leaking or not fully closed. Do not pull the cap off and turn a contained problem into a spill; seek help if you cannot control the release safely.
2. Secure the hose and sewer adapter
Attach the hose to the RV outlet using the fitting’s intended locking motion. Check that the gasket is seated and that the connection is secure without being forced.
Connect the other end to the approved sewer inlet. Use the correct adapter or site-required seal. Do not rely on a loose elbow resting over an open drain.
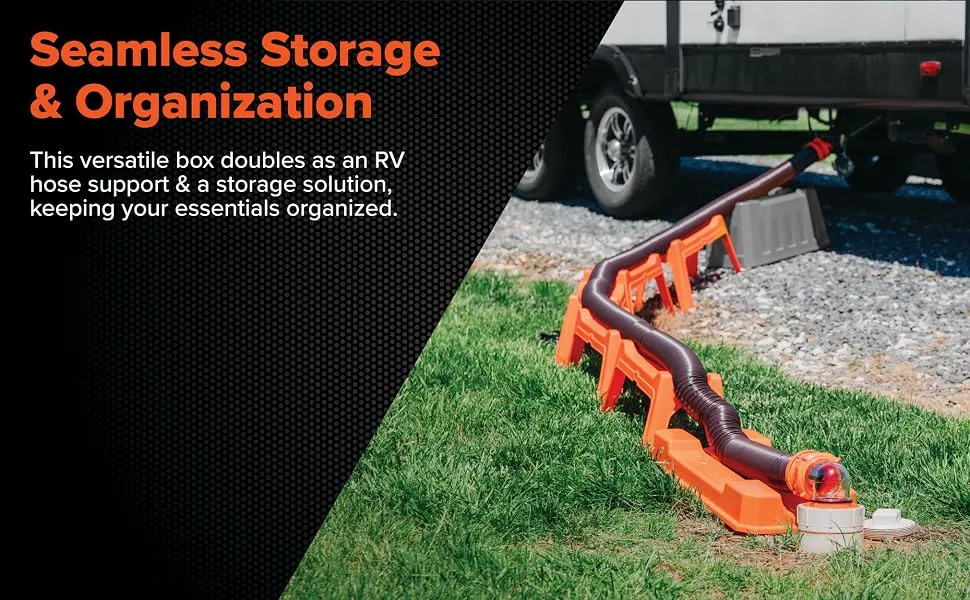
3. Support the hose
Set the support to create a continuous downhill route where the site allows it. Remove sharp bends, strain at the fittings, and low pockets.
There is no single slope figure that resolves every portable RV setup. Outlet height, inlet height, hose design, and local rules all matter. If the receiving inlet is too high, a longer hose will not solve the gravity problem.
4. Drain the black tank
After checking both ends, open the black-tank valve as directed by the RV manufacturer. Watch the connections for leaks and remain nearby.
Let the tank finish draining. Do not shake, step on, or squeeze a loaded hose to force waste through it. Close the valve when drainage is complete.
5. Flush only as the RV manual allows
If your RV has a built-in tank-flush system, follow its exact instructions for valve position and water supply. Do not improvise a closed-valve filling method.
Never leave a tank-flush system running unattended. An overfilled tank can cause a serious waste release inside the RV. Keep flush and rinse equipment separate from drinking-water equipment.
6. Drain the gray tank
Open the gray-tank valve after the black tank has drained and its valve is closed. Gray water helps move residue through the hose, but it does not disinfect it.
Close each valve when its tank is empty. If the RV has multiple gray tanks, use the sequence and outlets described in its manual.
7. Rinse, drain, and disconnect
Use the approved rinse source and method. Do not use a public rinse hose to fill a drinking-water tank, and do not put its end inside a sewer fitting.
Once rinsing is complete, close all waste valves. Leave the sewer end connected while you carefully drain residual liquid toward it. Disconnect, cap the RV outlet, and store the hose without spilling trapped contents.
Signs the process worked
The connections remained dry, flow stopped normally, and the hose drained without a trapped pocket. All valves are closed, the outlet cap is secure, and the dump area is clean.
A clear elbow helps show flow and visible debris. Clear-looking discharge does not prove that the tank is clean or disinfected.
Should You Leave the Sewer Hose Connected at a Full-Hookup Site?
You can leave a sound hose connected where the campground permits it, but that does not mean you should leave the tank valves open. Follow your RV’s instructions for managing each tank.
For a conventional black holding tank, keep the valve closed between dumps. The tank needs enough liquid to carry solids out. Continuous drainage can let liquid leave while solids remain.
Gray-tank practices vary by RV and site. Keeping gray water for the next dump also gives you water to send through the hose after the black tank drains. Do not create an improvised hose trap unless the system instructions call for one; trapped water adds weight and can freeze.
While connected, check the hose after foot traffic, maintenance work, or a change in weather. A sound setup at arrival can shift during a stay.
RV Sewer Hose Troubleshooting: Check the Safest Causes First
If flow stops or a leak appears, close the tank valve when it is safe to do so. Keep the hose connected until you have controlled the waste and identified the problem.
Use the symptom to guide your next check:
| Symptom | Possible causes | First safe check |
|---|---|---|
| Leak at a connector | Loose connection, damaged gasket, cracked fitting | Close the valve and inspect after controlling residual waste |
| Slow drainage | Sag, kink, limited tank contents, or blockage | Check the visible hose route before assuming a tank clog |
| No flow | Wrong valve, blocked outlet, frozen contents, or failed valve | Verify the correct tank and valve without forcing parts |
| Hose pulls loose | Poor engagement, excess strain, damaged tabs | Stop discharge and contain the spill |
| Odor near the hookup | Leaking seal, open inlet gap, or damaged hose | Inspect the outside connections and visible drain area |
| Waste appears behind the outlet cap | Leaking or partly open tank valve | Keep containment in place and avoid full cap removal |
Do not use compressed air, boiling water, or household drain cleaner to clear an RV waste system unless the manufacturer expressly permits the method. Pressure, heat, and chemicals can harm parts or expose you to waste.
A blocked or frozen system needs a different response from a bad gasket. Seek an RV service technician if a valve is stuck, waste backs up indoors, a hidden pipe leaks, or you cannot contain a spill. Report spills at public dump stations to the operator.
How to Clean, Store, and Replace the Hose
Drain and rinse the hose using an approved method, then store it apart from fresh-water gear. Cleaning lowers residue; it does not make a used sewer hose suitable for any clean-water task.
Follow the hose maker’s care instructions for any cleaning product. Do not mix cleaners. Avoid leaving the hose in strong chemical solutions unless the manufacturer permits it.
After rinsing, let the hose drain and dry as far as practical. Cap it for transport and use a dedicated, washable storage space. Wash contaminated reusable gear before storing it.
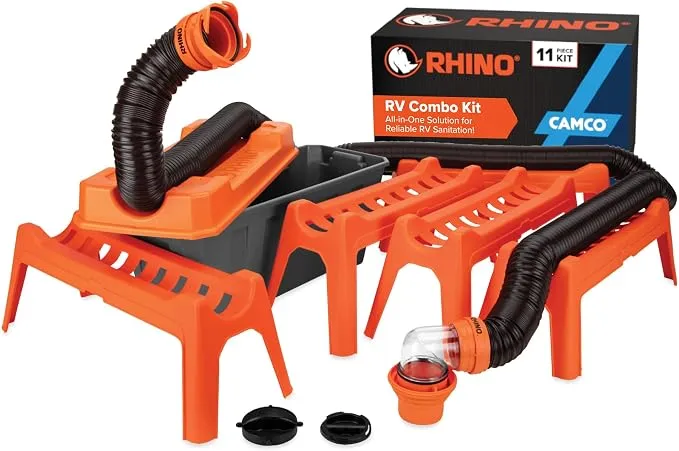
Check storage fit before buying
A hose’s compressed length is only one storage limit. The elbow, bayonet fitting, or fixed end collar may be too wide for a bumper or hose tube.
Keep fittings away from sharp edges and bare surfaces that can abrade them. If you use bumper storage, check its condition and whether the hose can move against rough metal.
Replace parts based on condition
There is no universal replacement interval for all RV sewer hoses. Sun, freezing weather, abrasion, storage, and use affect service life.
Replace the hose or the approved service part when you find:
- Pinholes, splits, or worn-through areas.
- Brittle material or exposed reinforcement.
- Cracked locking tabs or distorted fittings.
- A damaged seal that will not seat.
- A leak that correct assembly does not fix.
Tape may hide damage without restoring a dependable waste barrier. If a connection still leaks after the correct seal or fitting repair, stop using it.
After handling waste gear, remove gloves without touching the dirty outer surface and wash your hands. The CDC recommends scrubbing with soap for at least 20 seconds.
Frequently Asked Questions
Can I empty an RV into a home sewer cleanout?
Only if the local utility or responsible authority allows it and the connection is suitable. A cleanout’s location alone does not establish that it is an approved RV disposal point.
For a home septic system, confirm the system’s capacity, access point, and local rules with the septic professional or authority. Never discharge into a storm drain.
Do tank treatments replace rinsing or proper dumping?
No. A treatment does not replace sound valves, enough liquid for normal tank use, correct dumping, or a leak-free hose. Use only products allowed by your RV’s instructions and acceptable to the receiving wastewater system.
Avoid claims that an additive will fix a mechanical fault or make any waste safe to release.
Can the hose stay connected in freezing weather?
A hose may be damaged or blocked if liquid freezes inside it. A support can reduce low pockets, but it cannot make trapped waste freeze-proof.
Follow the RV’s cold-weather guidance and the campground’s rules. Do not use open flame or unapproved heating equipment to thaw waste plumbing.
Evidence Scope and Useful Next Questions
This guide provides general guidance for conventional U.S. RV gravity-drain systems. Live browsing, competitor-page inspection, and hands-on product testing were not available for this article. No current price, model ranking, warranty, or universal compatibility claim is made.
Use the exact RV and hose manuals for operating details. Primary references for the hygiene and wastewater boundaries discussed here include:
- CDC: About Handwashing — handwashing method and duration.
- EPA: How to Care for Your Septic System — waste-disposal and septic-care limits.
- Winnebago Operator Manuals — an example of model-specific RV documentation; owners of other makes should use their manufacturer’s manual.
These references are not presented as a live-checked source review. Product-specific advice still requires the correct model and manual version.
The following next-question map records useful follow-up needs without claiming verified search demand or competitor omissions.
| Next question | Reader stage | Basis | Competitor coverage | Benefit and evidence needed | Priority and placement |
|---|---|---|---|---|---|
| Will the fittings fit my RV and storage bay? | Before purchase | Inferred from fit constraints | Not checked | Avoid an unusable kit; confirm dimensions and manuals | High; selection and storage |
| What if the sewer inlet is above the RV outlet? | Setup | Inferred from gravity drainage | Not checked | Avoid poor drainage; check site layout and system instructions | High; connection steps |
| What if waste is trapped behind the cap? | Before dumping | Inferred from valve-leak risk | Not checked | Limit exposure and spills; follow valve service guidance | High; setup and troubleshooting |
| Can I dump at home? | After travel | Inferred from disposal needs | Not checked | Avoid an improper discharge; obtain local approval | High; FAQ |
Conclusion
Choose an RV sewer hose kit by checking connection fit, usable reach, secure seals, and storage space. More hose is not always better, and an adapter is useful only when it fits the actual inlet.
Before your next U.S. campground stay, inspect the outlet and valves, measure your storage space, and confirm what the kit includes. At the dump point, secure the full path before opening a valve, follow the RV’s dump sequence, and stop if you cannot control a leak.