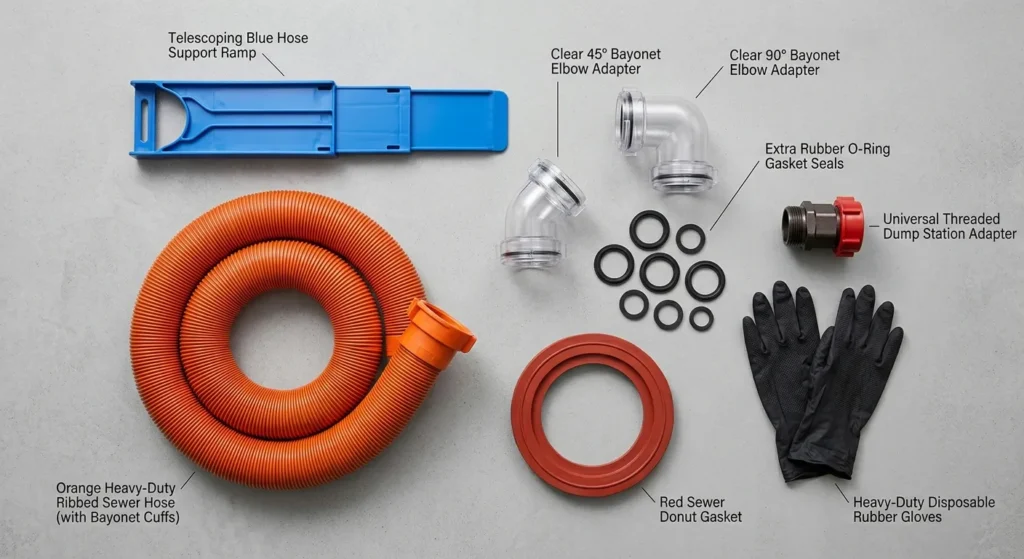
For most RV trips in the United States, the core sewer setup includes a compatible sewer hose, a secure campground drain adapter, intact seals, a hose support, disposable gloves, and a separate rinse hose. These RV sewer accessories help move wastewater from your holding tanks to an approved dump station or full-hookup campsite with less risk of leaks and spills.
Start with the parts that fit your RV and the places you camp. A large accessory kit is not always the right choice. A sound connection, enough hose reach, and clean handling matter more than extra fittings.
This guide explains what each part does, how to check fit, and how to dump and store your gear safely.
Which RV Sewer Accessories Do You Need?
Buy the parts that create a secure waste path first. Add tools for extra reach, rinsing, or special drain layouts only when your setup calls for them.
The table below separates core gear from items that solve a specific problem.
| Accessory | What it does | When to choose it | Main limit or fit check |
|---|---|---|---|
| RV sewer hose | Carries waste from the RV outlet to the drain | Needed for a standard gravity-dump setup | Check both end fittings and usable length |
| Campground drain elbow or adapter | Connects the hose to the sewer inlet | Needed when the hose end does not fit the drain directly | Drain threads, opening size, and seal rules vary |
| Hose support | Holds the hose off the ground and helps maintain a downhill path | Useful at full-hookup sites and where required | Cannot make waste flow uphill |
| Disposable gloves | Reduce direct hand contact with waste and dirty fittings | Use when connecting, dumping, cleaning, and packing | Gloves do not replace handwashing |
| Dedicated rinse hose | Supplies water for approved waste-system rinsing | Useful at sites that allow rinsing | Keep separate from drinking-water gear |
| Clear sewer elbow | Lets you see flow and remaining rinse water | Helpful for checking when discharge slows or stops | Does not prove a tank is clean |
| Sewer hose extension | Adds reach | Useful when the campsite drain is farther away | Adds another joint that can leak |
| Replacement seals and caps | Restore worn seals and close exposed fittings | Useful as compact spare parts | Match the fitting design |
| Sewer fitting wrench | Helps turn compatible fittings | Useful when grip or access is poor | Too much force can crack plastic |
| Separate storage bin or carrier | Keeps dirty gear away from clean gear | Useful in nearly every RV | Must fit the hose ends, not just the hose |
| Macerator pump | Grinds and pumps waste through a smaller discharge hose | For routes a gravity hose cannot serve | Needs approved power, hose, head limits, and operating steps |
A simple gravity system usually needs fewer parts and less upkeep than a pump system. A macerator is a different waste-transfer method, not a required upgrade.
“For a closer look at hose lengths, fitting compatibility, and safe dumping practices, I recommend reading my RV Sewer Hose Guide: Sizes, Fittings, Kits & Safe Dumping.”
What do “black water” and “gray water” mean?
Black water comes from the toilet holding tank. Gray water usually comes from sinks and showers, though plumbing layouts differ.
Both belong in an approved wastewater system. Gray water can contain food waste, grease, soap, and germs. Do not assume it is safe to drain onto the ground.
How to Choose Parts That Fit Your RV
Check the RV outlet, hose ends, campsite drain, and storage space before buying. A product labeled “RV sewer accessory” is not proof that it fits every RV.
Many conventional RV gravity systems use a nominal 3-inch outlet with a twist-lock bayonet connection. Some RVs use different fittings, built-in waste systems, or separate tank outlets. Confirm your setup in the owner’s manual and by looking at the actual connection.
Check all four connection points
- RV outlet: Identify the outlet type, locking tabs, and space around the cap.
- Hose ends: Check the connector type, seal, and how each end locks.
- Campground drain: Check whether it needs a threaded adapter, a gasket, or another approved connection.
- Storage opening: Measure the space needed for the largest fixed fitting.
A hose may fit inside a storage tube while its attached elbow does not. Check the whole assembly before choosing a carrier.
Do not force mismatched fittings together. A connector that seems nearly right can still leak when the hose fills.
Choose length for reach and drainage
Use enough hose to reach the drain without pulling on either connection. Avoid large coils and low spots where waste can collect.
For travel to varied sites, a main hose plus an extension can offer more options than one long hose. The trade-off is one more connection to check and clean.
Hypothetical example: If the route from the RV outlet to the sewer inlet is about 12 feet, a 10-foot hose will not reach. A longer assembly may work, but only if it can follow that route without tension or deep sags. Check the maker’s usable-length guidance; the package length alone does not show how the hose will sit at your campsite.
Check the slope, not just the distance
A gravity hose needs a downhill path. A support helps prevent sags, but it cannot fix a drain inlet that is too high.
Before opening a valve, look along the full hose route. If the hose must climb uphill, reposition the RV if allowed, use a different approved drain, or consider a suitable pump system. Never try to solve the problem by pressurizing a gravity sewer hose.
Check campground connection rules
U.S. campgrounds may require a sealed drain connection, hose support, or other site-specific measures. Ask the host or read the posted rules before setup.
A multi-size adapter can help with different drain fittings. It still does not guarantee a fit at every site.
How to Connect and Use RV Sewer Accessories Safely
Connect and secure the full waste path before opening a tank valve. Keep waste gear away from fresh-water gear from start to finish.
Use your RV, hose, and tank-flush manuals for the exact steps. The sequence below applies to many conventional gravity-dump systems, but built-in pumps and unusual tank layouts may need a different method.
Before you start
Have these items ready:
- An approved dump point with a usable drain.
- A hose and adapters that fit.
- Intact seals and locking fittings.
- Disposable gloves.
- Access to soap and clean running water.
- A separate rinse hose, if rinsing is allowed.
- A way to contain and store used gear.
Keep children and pets away from the work area. Do not use an inlet that appears blocked, damaged, or already backed up.
Step 1: Inspect the setup
With the tank valves closed, check the hose for cracks, holes, crushed sections, and worn ends. Check that seals are present and seated.
Wear gloves when removing the RV outlet cap. A closed valve can leak, so stand clear of the opening and be prepared for trapped liquid.
If waste escapes in an uncontrolled flow, stop. Do not continue as though the system is empty.
Step 2: Secure both ends
Attach the hose to the RV outlet and lock it as designed. Fit the drain adapter to the campground inlet and secure the hose end.
Route the hose on its support with a downhill path where possible. Do not rely on a loose hose end staying inside the drain.
Step 3: Empty the black tank
Open the black-tank valve according to the RV manual. Stay nearby and watch for leaks, hose movement, or drain backup.
Allow flow to slow and stop. A clear elbow can help you see discharge, but little or no flow does not prove the tank is empty. A clog, closed valve, or poor hose slope can produce the same sign.
Step 4: Rinse only as the system allows
If the RV has a built-in tank-flush inlet, follow its instructions exactly. Many systems warn that the black-tank drain valve must stay open while flushing.
Use only the intended inlet. Never leave a flush system running unattended. Filling a closed waste tank can force wastewater back into the RV or damage the system.
Keep the rinse hose separate from any hose used to fill the drinking-water tank. Use required backflow protection, and do not remove or bypass a factory-installed device.
Step 5: Close the black valve and empty the gray tank
After the black tank has drained and any approved rinse is complete, close its valve. Open the gray-tank valve if your system routes it through the same outlet.
Gray water can carry some residue out of the shared hose. It does not disinfect the hose or make it safe to handle without care.
Once flow stops, close the gray valve.
Step 6: Drain, disconnect, and pack
If rinsing is permitted, rinse the sewer hose using the designated water supply. Follow the dump station’s rules.
Drain the hose into the sewer inlet before disconnecting it. Keep the drain end in place while carefully lifting the hose from the RV end toward the inlet, without stressing the joints.
Cap or contain the gear as designed. Remove gloves without touching the dirty outer surfaces, then wash your hands with soap and clean running water.
What a successful dump looks like
The connections remain secure, the drain does not back up, and no waste escapes onto the ground. Flow slows and stops before you close the valves and pack the gear.
Tank sensors alone are not proof of success. Residue can affect readings, so use the tank’s behavior, the visible discharge, and the owner’s manual together.
Troubleshooting Leaks, Slow Flow, and Poor Drainage
Stop the flow first when a leak or backup appears. Close the tank valve if it is safe to do so. Do not twist apart a connection that may still hold wastewater.
Start with checks outside the system before trying to clear an internal blockage.
| Symptom | Possible causes | First checks | When to stop |
|---|---|---|---|
| Leak at a coupling | Missing seal, damaged seal, loose lock, mismatched parts | Close the valve; drain safely; inspect and reseat the connection | Fitting is cracked or will not lock |
| Leak through the hose wall | Puncture, abrasion, split material | Stop flow and replace the damaged hose | Do not depend on tape for continued use |
| Slow discharge | Kink, sag, uphill section, blockage, valve issue | Check the hose route and confirm the correct valve is open | Drain backs up or the tank remains full |
| No discharge from a tank believed to be full | Clog, valve fault, or incorrect level reading | Confirm tank identity and valve position | Do not remove a valve or fitting under a full tank |
| Water rises at the campsite inlet | Blocked drain or inadequate site drainage | Close the RV valve and notify campground staff | Do not keep dumping to test it |
| Liquid appears behind the travel cap | Trapped residue or a leaking valve | Use gloves and contain it; assess whether it recurs | Persistent leakage needs repair |
| Odor remains after dumping | Spill, loose cap, plumbing-seal issue, or vent fault | Check visible spills, caps, and accessible seals | Persistent indoor odor needs diagnosis |
A clear fitting is a viewing window, not a tank inspection tool. It cannot confirm the state of hidden plumbing or all surfaces inside a tank.
Avoid compressed air, caustic drain cleaners, and improvised pressure methods. A blocked tank or failed valve is a job for a qualified RV service technician when the manual’s approved steps do not resolve it.
If sewage spills, keep people and pets away and alert campground staff. Follow local cleanup directions. Do not wash sewage into a storm drain.
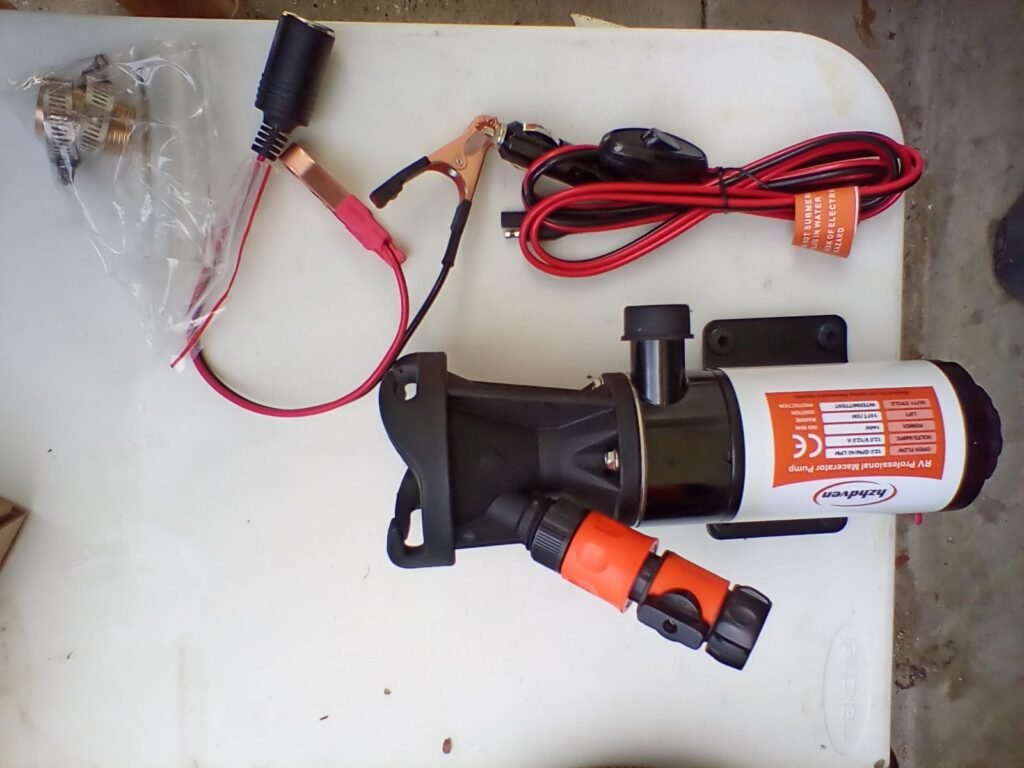
RV Macerator Pump
How to Clean, Store, and Replace Sewer Gear
Keep sewer gear in its own storage space, away from drinking-water equipment. The outside of a hose, cap, or fitting may be dirty even when it looks clean.
Use a washable bin or a purpose-built carrier. Do not store sewer parts with fresh-water hoses, drinking-water filters, water jugs, or food gear.
Rinse without spreading contamination
Use the designated rinse supply where one is provided. Do not place a faucet nozzle or hose end inside a sewer hose.
A hose connected to a potable-water source can become contaminated through poor handling or backflow. Label your waste-rinse hose and keep it separate from potable-water equipment.
CDC guidance for workers handling human waste supports the core precautions used here: avoid direct contact, use suitable protective equipment, and wash with soap and water after the task. That guidance is not an RV-specific operating manual.
Use cleaners only as directed
Choose cleaners that the hose or system maker allows. Follow the product label for dilution, contact time, and material limits.
Never mix bleach with ammonia, acids, toilet cleaners, or unknown tank chemicals. Do not improvise a stronger mix to remove odors.
Replace parts based on condition
Replace a hose or fitting when you find:
- Cracks, pinholes, or splits.
- Brittle material.
- Worn or broken locking tabs.
- Seals that no longer seat.
- Repeated leaks after correct assembly.
- Damage that prevents a secure connection.
There is no single replacement schedule that fits all RV sewer hoses. Sun, storage, handling, and use all affect wear. Inspect the system before each dump rather than relying only on its age.
Evidence, Sources, and Research Limits
This guide is a practical synthesis, not a hands-on product test or a verified comparison of current products. Live browsing was not available for this draft. No competing pages, current prices, product revisions, or local campground rules were inspected.
The article therefore avoids brand rankings and model-specific fit claims. Use the sources below for their stated scope, and check the current manual for your exact equipment before acting.
| Source | What it supports | Scope limit |
|---|---|---|
| CDC: Protecting Workers Handling Human Waste | Hygiene and protective measures when handling human waste | Occupational guidance, not an RV dumping procedure |
| CDC: About Handwashing | Handwashing as a key hygiene measure | Does not establish that RV equipment is clean |
| EPA: How to Care for Your Septic System | Limits on what should enter a septic system | Does not grant permission to dump RV waste at a home |
| Your RV and accessory manuals | Connections, valve use, flushing, cleaning, and operating limits | Applies to the exact model and revision |
| Campground or dump-station rules | Approved drain, connection, rinse, and spill procedures | Applies to that facility |
Next-question gap map
These are inferred next needs, based on the task—not observed search demand. Competitor coverage is marked NOT CHECKED because no pages were inspected.
| Next question | Reader stage and basis | Competitor coverage | Reader benefit | Answer evidence | Priority and placement |
|---|---|---|---|---|---|
| Will the fittings fit both the RV and drain? | Before purchase; inferred from the two connection points | NOT CHECKED | Avoids unusable parts and leaks | Exact manuals and physical checks | High; compatibility section |
| What if the campsite drain backs up? | During dumping; inferred safety need | NOT CHECKED | Limits spills and exposure | Facility procedures and system instructions | High; troubleshooting section |
| Can the waste-rinse hose share fresh-water storage? | After dumping; inferred contamination risk | NOT CHECKED | Helps keep clean gear separate | CDC hygiene principles and equipment instructions | High; storage section |
| Can an RV dump into a home cleanout? | After travel; inferred disposal need | NOT CHECKED | Prevents unauthorized or unsuitable discharge | Local utility rules and septic guidance | High; FAQ |
No claim is made that these topics are missing from the wider internet.
FAQs About RV Sewer Accessories
Can I dump my RV into a home sewer cleanout?
Only after confirming that local rules allow it and that the connection leads to a suitable sanitary sewer or septic system. Never use a storm drain, street inlet, or opening whose purpose is unknown.
Ask the sewer utility or a qualified plumber about a municipal connection. For a septic system, consult the local authority or septic service provider about capacity and any tank-treatment chemicals.
Should I leave the black-tank valve open at a full-hookup site?
For a conventional holding-tank system, generally no. Leaving it open can let liquids drain while solids remain.
Follow the RV manual. Gray-tank valve practices may differ by system and campground, so do not assume both valves should stay in the same position.
Do tank treatments replace rinsing or sewer accessories?
No. A treatment cannot replace a sound hose, secure drain connection, or correct dumping method.
Claims about odor control and waste breakdown depend on the product and conditions. Use only products permitted by your RV manufacturer and the receiving wastewater system.
What changes in freezing weather?
Residual water can freeze in hoses, fittings, and low spots. A normal hose support or storage cap does not provide freeze protection.
Follow the RV’s cold-weather instructions and drain gear promptly. Do not use an open flame to thaw sewer parts. Use heat products only when they are approved for the materials and conditions involved.
Are a sewer hose and a tank-flush hose interchangeable?
No. They serve different jobs. A sewer hose carries wastewater from the tank outlet, while a tank-flush supply hose delivers water to an approved rinse inlet.
Keep both away from your drinking-water hose. Similar-looking water-hose fittings do not make waste-rinse equipment suitable for potable use.
Conclusion
The right RV sewer accessories form a secure waste path: a compatible hose, a proper drain adapter, intact seals, and enough support to prevent sags. Gloves, a separate rinse hose, and dedicated storage help keep the task contained.
Before your next U.S. campground stay, inspect your outlet and fittings, measure the hose route, and read the site’s dump rules. Fix worn parts before travel, and stop dumping at the first sign of a leak or backup.