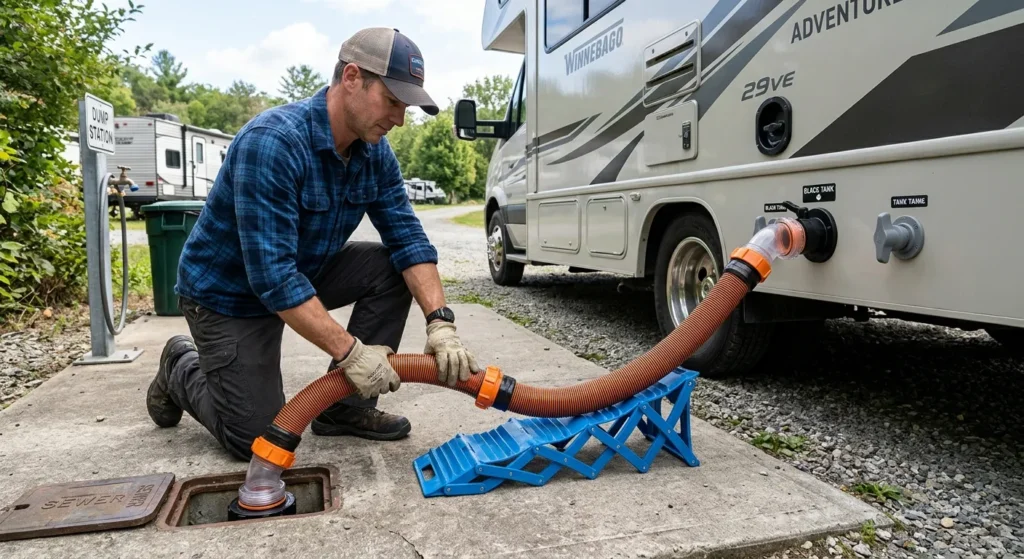
When choosing an RV Septic Hose, I focus on three essentials: a proper fit, enough reach without strain, and secure connections at both ends. Often called an RV sewer hose, it carries wastewater from your holding tanks to an approved campground sewer connection or dump station. Most conventional gravity-drain RV systems use a nominal 3-inch sewer connection, but I recommend checking your outlet and fittings before buying.
In this guide, I explain how to select a suitable hose, dump safely, troubleshoot common problems, and store your equipment to reduce contamination risks. My priority is a practical setup that helps prevent leaks, clogs, and unnecessary contact with sewage—while following campground rules and your RV manufacturer’s instructions.
What Is an RV Septic Hose?
An RV septic hose is a flexible wastewater hose that connects an RV’s holding-tank outlet to an approved sewer inlet. It does not treat waste, and it is not the same as a household septic drain line.
Most RVs have two types of wastewater tanks:
- Black-water tank: Holds toilet waste.
- Gray-water tank: Holds wastewater from sinks and showers.
Many RVs route both tanks through one shared outlet, with a separate valve for each tank. Other layouts have more than one outlet. Check your RV’s owner’s manual before buying a hose kit or opening a valve.
The Main Parts of a Sewer-Hose Setup
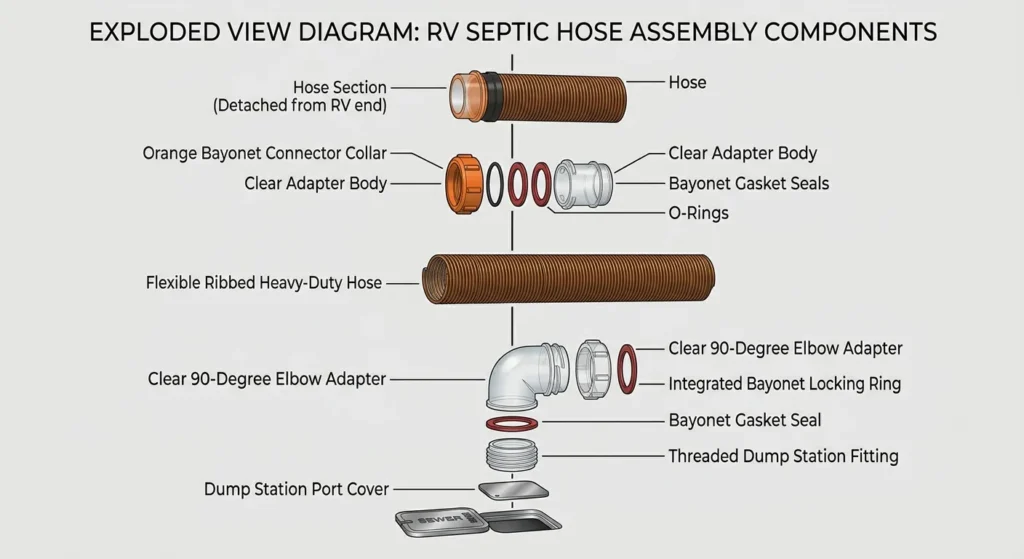
A complete setup may need more than the hose itself.
| Part | Purpose | What to check |
|---|---|---|
| Sewer hose | Carries wastewater to the drain | Length, condition, flexibility, and fitting type |
| RV-end fitting | Locks onto the RV waste outlet | Match to the outlet’s connection and locking lugs |
| Sewer adapter | Connects the hose to the campground inlet | Fit, seal, and campground requirements |
| Gaskets | Seal the hose connections | Correct size; no cracks, grit, or distortion |
| Hose support | Holds the hose above the ground | Enough support to prevent low spots |
| Storage caps | Contain residual drips during transport | Fit both hose ends securely |
| Protective gloves | Reduce direct contact with wastewater | Intact and suitable for the task |
A clear elbow is optional. It can help you see when flow has slowed, but clear-looking discharge does not prove that a tank or hose is sanitary.
“For a closer look at hose types, fittings, and setup, I recommend reading my RV Sewer Hose Guide.”
How to Choose the Right RV Sewer Hose
Choose a hose by connection type, usable reach, drainage needs, and storage space. A thick hose is not useful if its fittings do not match your RV or it cannot drain properly at your campsite.
Check Compatibility Before Buying
Many conventional U.S. RV sewer outlets use a nominal 3-inch bayonet-style connection. Do not assume that every RV or wastewater system uses that setup.
Confirm:
- The outlet size and fitting style.
- Whether the RV has one outlet or several.
- The campground-end adapter needed.
- Whether extensions connect to the main hose.
- Whether the fittings fit inside your storage compartment.
Macerator systems use a pump and may use a smaller discharge hose. A standard gravity sewer hose is not an interchangeable substitute. Follow the pump manufacturer’s hose and operating requirements.
Choose Enough Length Without Adding Excess
The hose should reach the drain with some slack at both ends. It should not pull on the RV outlet or stretch across a walking path.
An oversized hose can create extra bends and low spots that hold wastewater. Modular sections offer flexibility, but each added joint is another connection to inspect for leaks.
Hypothetical example: If the route from the RV outlet to the sewer inlet measures 13 feet, a 15-foot hose may provide enough reach. That depends on bends, elevation changes, and the hose’s actual usable length. Measure the route the hose will follow, not just the straight-line distance.
Match the Setup to the Site
Use this table to identify what matters most for your camping pattern.
| Situation | Main need | Practical response |
|---|---|---|
| Short stays at dump stations | Fast, reliable setup | Use a manageable hose with secure fittings |
| Frequent full-hookup stays | Stable drainage | Add a support that prevents sags |
| Campsites with distant inlets | Extra reach | Carry a compatible extension |
| Small storage bay | Compact storage | Check compressed size and fitting dimensions |
| Cold-weather camping | Material and freeze limits | Check the hose’s documented temperature limits |
| Uphill sewer inlet | A different drainage method | Reposition if allowed or use a suitable pump system |
There is no universal “best” hose material or thickness. Manufacturer specifications can establish dimensions and stated limits, but they do not prove that one hose will outlast another in every campsite.
How to Connect and Use an RV Septic Hose
For a conventional gravity-drain RV, the usual sequence is to connect the hose securely, empty the black tank, then empty the gray tank. Your RV manual and posted dump-station rules take priority if they specify a different procedure.
Before You Start
Park securely and keep children and pets away from the work area. Have these items ready:
- An intact sewer hose and matching adapter.
- Protective gloves.
- A hose support, if needed.
- A dedicated wastewater-rinse hose, where rinsing is permitted.
- A separate container for wastewater equipment.
- Access to soap and clean water for handwashing.
Keep drinking-water hoses and fittings separate from sewer equipment. Do not use a fresh-water hose to rinse a sewer hose, even if you plan to clean it afterward.
Check that the dump station is open, the drain is usable, and the site allows your type of waste. Never use a storm drain or an unapproved opening.
Step 1: Inspect the Hose and Close Both Tank Valves
Look for cracks, punctures, crushed sections, loose fittings, and damaged seals. Check the gaskets for grit that could prevent a tight seal.
Confirm that both waste valves are closed before removing the RV outlet cap. Stand clear of the opening and remove the cap carefully; a leaking valve can leave trapped wastewater behind it.
If waste escapes with the valves closed, stop and address the valve problem before continuing.
Step 2: Secure Both Ends
Attach the hose to the RV outlet and lock it as directed by the fitting manufacturer. Connect the other end to the approved sewer inlet with the required adapter.
Do not open a tank valve while the drain end is loose. If the campground inlet has damaged threads or cannot hold a secure connection, ask staff for help rather than improvising a weak seal.
Step 3: Set a Downhill Drainage Path
Arrange the hose so wastewater can flow toward the inlet without pooling. A hose support helps prevent dips that act like small traps.
Avoid sharp bends, crushed sections, and exposed routes where people may trip. An inlet above the RV outlet can prevent a gravity system from draining fully. More hose will not solve an uphill run.
Step 4: Empty the Black Tank
Open the black-tank valve according to the RV manufacturer’s procedure. Stay nearby and watch the hose and both connections.
Let the tank drain until flow has substantially stopped, then close the valve. Do not force a stiff valve or leave the station unattended while a valve is open.
Step 5: Rinse the Tank Only as Directed
If the RV has a built-in tank-flush system, follow its exact instructions. Confirm the correct connection, water-pressure limits, and required valve position.
Never leave a tank-flush system running unattended. If water enters faster than it can leave, the tank can overfill. A flush system’s backflow device does not make shared fresh-water and wastewater equipment a good practice.
Step 6: Empty the Gray Tank
After closing the black-tank valve, open the gray-tank valve. Gray water carries soap, food residue, and other waste, but its flow can help move remaining black-water residue through the shared hose.
Close the gray valve when drainage is complete. Gray water does not disinfect the hose.
Step 7: Drain, Disconnect, and Store
With both valves closed, allow the hose to drain. Keep the sewer end secured while disconnecting the RV end, and avoid lifting a hose that still holds wastewater.
If rinsing is permitted, use the designated rinse supply and keep all rinse water within the approved disposal system. Drain the hose, disconnect the sewer end, replace the RV outlet cap, and cap the hose for transport.
Remove gloves without touching their contaminated surfaces. Wash your hands with soap and clean water.
Signs the Process Worked
A successful dump leaves:
- No leaks at either connection.
- No wastewater pooled in hose sags.
- Both tank valves closed.
- The RV outlet capped.
- The drain area free of spills.
Tank-level lights may still show waste after draining because residue can affect some sensors. Do not keep adding water solely to force the display to read empty.

Should RV Sewer Valves Stay Open at a Full-Hookup Site?
Keep the black-tank valve closed between dumps unless your RV manufacturer directs otherwise. The tank needs liquid to help carry solids out during emptying.
Leaving the black valve open lets liquids drain away while solids may remain. Think of the tank as a bucket that must empty with enough water—not a household toilet pipe that gets a fresh flush each time.
For gray water, keeping the valve closed between dumps is a useful default. It preserves water for a later dump and avoids leaving an open path between the campground sewer connection and the tank.
A gray tank can still fill quickly during showers or laundry. Monitor its level and follow the RV’s guidance if you use a different gray-water routine.
At a full-hookup site, the hose may stay connected when permitted. Keep it supported, protect it from traffic, and inspect the connections before each dump.
How to Fix Common RV Sewer-Hose Problems
Start by stopping the flow if you can do so safely. Then check the hose path and visible connections before attempting tank repairs.
| Symptom | Possible causes | First safe checks | When to stop |
|---|---|---|---|
| Leak at a connection | Misaligned fitting, dirty gasket, damaged seal | Close the valve; drain the hose before adjusting | Replace cracked fittings or failed seals |
| Slow drainage | Sag, kink, partial blockage, uphill run | Check the visible hose route | Stop if a tank blockage is suspected |
| No flow from a tank that seems full | Wrong valve, stuck valve, blockage, faulty gauge | Confirm the layout and valve position | Do not force the valve or add more water |
| Odor near the hookup | Poor inlet seal, residue, leak | Inspect the adapter and hose exterior | Stop using a damaged hose |
| Hose pulls loose | Strain, poor engagement, unstable support | Close the valve if safely reachable | Contain the spill and get help |
| Frozen wastewater | Trapped liquid and cold exposure | Stop using the affected setup | Do not use flames or force fittings |
If Sewage Spills
Keep people and pets away. Stop the discharge if it is safe, then notify campground or dump-station staff.
Do not hose sewage into soil, a storm drain, or nearby water. Follow the facility’s spill procedure. For a large spill, an inaccessible valve, or ongoing discharge, seek qualified help.
If the Tank Will Not Empty
Do not force tools through the outlet or use compressed air to clear the system. Avoid household drain chemicals unless the RV manufacturer specifically approves the product for that use.
A blocked tank may require controlled service access and waste collection. Stop adding water if the tank may already be full, and contact a qualified RV technician or waste-service provider.
How to Clean, Store, and Replace an RV Sewer Hose
Rinse and drain the hose after use where the facility permits it. Store sewer equipment apart from drinking-water hoses, filters, and fittings.
Cleaning and Storage
Use a dedicated wastewater-rinse hose, not your potable-water hose. Do not lay rinse equipment on drinking-water fill ports or shared fresh-water taps.
Let the sewer hose drain as fully as practical before capping it. Use a dedicated storage compartment or container that can contain residual drips. Keep contaminated gear off picnic tables and food-preparation surfaces.
Cleaning reduces residue; it does not turn a used sewer hose into sanitary equipment. If you use a cleaner or disinfectant, confirm that the label permits the use and that it is compatible with the hose. Never mix cleaning chemicals.
When to Replace the Hose
Replace a hose or fitting when you find:
- Cracks, splits, or pinholes.
- Brittle sections.
- Fittings that will not lock securely.
- Failed seals that cannot be replaced.
- Damage that prevents safe drainage.
There is no dependable replacement interval for every hose. Sun exposure, storage, abrasion, temperature, and use all affect its condition.
Tape is not a reliable repair for a hose that contains sewage. Replace the damaged section before the next dump.
Cold-Weather Limits
A hose can freeze when wastewater remains in its low spots. Drain it promptly and check its stated temperature limits.
Do not use a torch or open flame to thaw sewer equipment. Do not add heat tape unless the hose and heating product manufacturers expressly allow that combination. For prolonged freezing conditions, use an RV-specific cold-weather plan.
Frequently Asked Questions
Can I Empty My RV Into My Home Septic System?
Possibly, but only through an approved access point and with local permission. A cleanout is not automatically an authorized RV dump connection.
Ask the local health or wastewater authority and a licensed septic professional before doing so. Tank capacity, system condition, waste volume, and additives can affect the answer. The EPA’s septic-care guidance explains why water use and what enters the system matter.
Can I Use a Garden Hose Instead of an RV Sewer Hose?
Not for a standard gravity-fed black-water outlet. A garden hose is too small for that connection and is not a substitute for a purpose-built sewer hose.
Some macerator pumps use smaller discharge hoses. Use only the hose type, diameter, and length allowed by the pump manufacturer.
Do Tank Additives Remove the Need to Rinse the Sewer Hose?
No. Tank treatments do not replace proper dumping, hose drainage, or cleaning.
Use only products compatible with your RV and allowed by the receiving facility. Do not assume that an odor-control or waste-digestion claim means the product disinfects the hose.
Can Two RV Sewer Hoses Join Into One Campground Inlet?
Sometimes, with a purpose-built fitting and campground approval. Both branches need secure connections and a usable drainage path.
This can help RVs with separate outlets. Do not improvise with fittings that cannot securely contain wastewater.
Can I Bury an RV Sewer Hose for a Long-Term Site?
Do not treat a flexible RV sewer hose as permanent buried plumbing. Burial can hide leaks and expose the hose to crushing or damage.
Ask the campground and local authority about approved permanent connections. A long-term installation may require code-compliant pipe and professional work.
Sources, Evidence Limits, and Next-Question Map
This guide provides general guidance for conventional U.S. RV gravity-drain systems. Live browsing, current product-manual checks, and competitor-page inspection were not available for this draft. No product rankings, hands-on testing claims, or verified search-demand claims are presented.
Use the manual for your exact RV and wastewater equipment to confirm operating steps. Official starting points include Winnebago operator manuals, Jayco owner resources, and the EPA guidance linked above. For hygiene, consult the CDC’s handwashing guidance. These resources do not establish compatibility with every hose or RV.
The page serves as a central informational guide. No site map was supplied, so parent and neighboring pages have not been identified.
The following questions are inferred from the task, not observed search queries. Competitor coverage remains NOT CHECKED.
| Next question | Reader stage | Basis and source | Competitor coverage | Reader benefit and answer evidence | Priority and placement |
|---|---|---|---|---|---|
| What if the inlet is uphill? | Setup | Inferred from gravity-drain operation | NOT CHECKED | Avoids a setup that cannot drain; confirm alternatives in equipment manuals | High; selection and connection sections |
| What if nothing flows? | Dumping | Inferred from valve and blockage risks | NOT CHECKED | Helps prevent overfilling or forced repairs; exact diagnosis requires model guidance or service | High; troubleshooting |
| Can I dump at home? | After travel | Inferred from disposal needs | NOT CHECKED | Separates physical access from approval and capacity; EPA context plus local authority needed | High; FAQ |
Conclusion
Choose an RV septic hose that matches your outlet, reaches without strain, and drains without sags. Secure both ends before opening a valve, empty the black tank before the gray tank for a conventional setup, and keep sewer gear away from drinking-water equipment.
Before your next trip, inspect the hose, seals, and fittings. Then check your RV manual and destination’s dump rules so the process is clear before you handle wastewater.