Before I loosen any RV waste-valve bolts, I make sure the black tank is emptied and rinsed at an approved dump station or sanitary sewer hookup. In this How To Change Black Tank Valve guide, I explain the replacement process for a common RV setup: an accessible, manually operated valve secured between two flanges with four bolts.
My approach starts with checking the manufacturer’s instructions and matching the replacement valve and seals. From there, I cover supporting the drain pipes, removing the old valve, fitting the replacement without displacing its seals, and checking for leaks with clean water.
This procedure does not apply to every RV. Cable-operated valves, electric valves, and assemblies behind an enclosed underbelly may require different steps. If the tank still contains waste or cannot drain, I do not remove the valve—it may be the only barrier preventing an uncontrolled sewage release.
What Is a Black Tank Valve, and Does It Need Replacement?
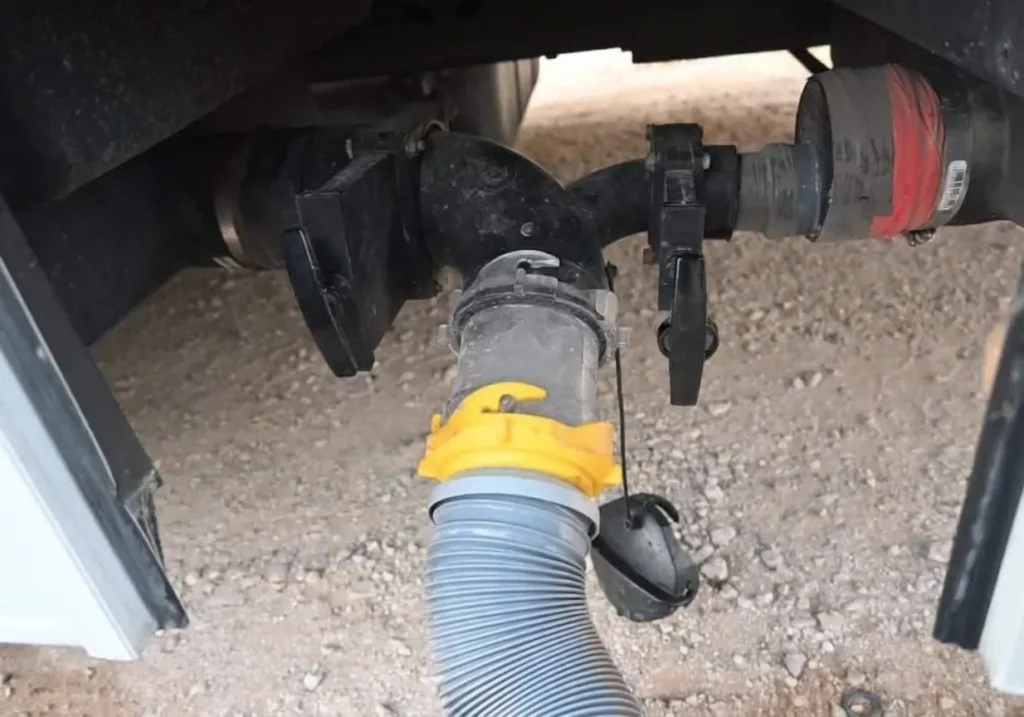
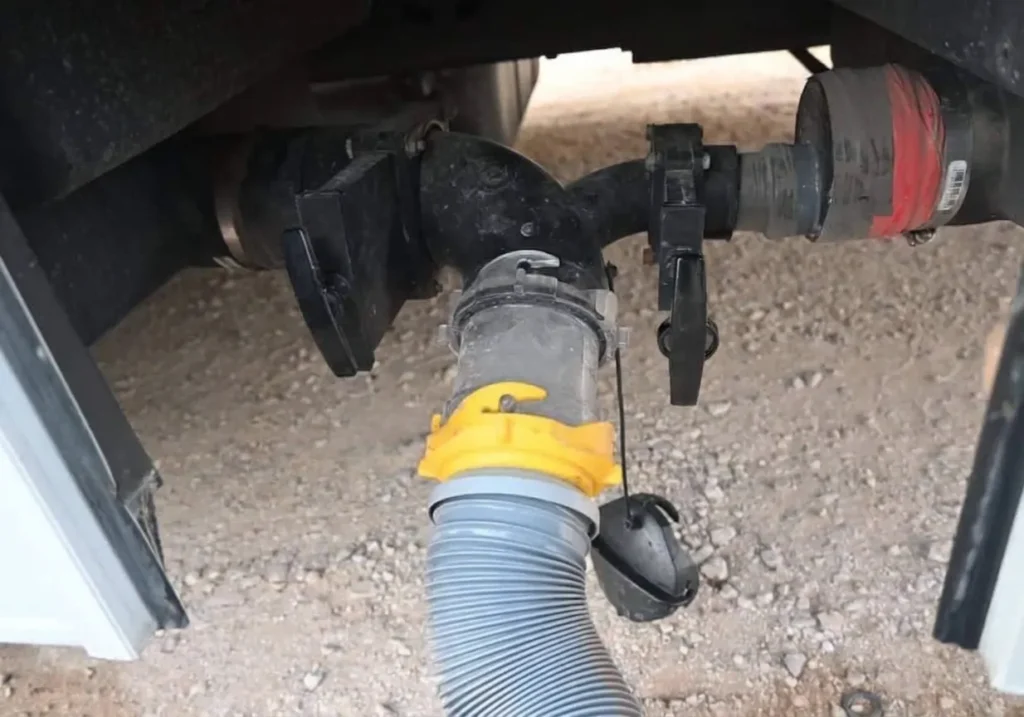
A black tank valve controls the flow of toilet waste from the RV’s holding tank into the sewer hose. Most common manual valves use a sliding blade, also called a gate, that moves between two seals.
The valve body sits between pipe flanges. On many assemblies, four bolts hold the flanges and valve body together. This design often lets you replace the valve without cutting pipe, provided the flanges are sound and there is enough room to separate them.
A wet drain outlet does not always mean the valve needs replacement. Use these checks before buying parts.
| Symptom | Possible cause | Best next check |
|---|---|---|
| Liquid collects behind the outlet cap | Black or gray valve seepage, or liquid left in the shared drain | Empty both tanks, clear the shared outlet, and test each tank separately |
| Liquid leaks around the valve body | Damaged seal, loose hardware, cracked body, or flange misalignment | Clean and dry the area, then locate the exact leak |
| Handle is hard to pull | Debris, damaged seals, a bent rod, or cable resistance | Inspect the actuator and follow the valve maker’s service guidance |
| Handle moves but waste does not drain | Disconnected actuator, blockage, or a failed gate | Stop; do not assume the tank is empty |
| Water leaks where the sewer hose attaches | Damaged hose gasket or outlet fitting | Inspect the connection before replacing the tank valve |
The key distinction is between an external leak around the assembly and internal seepage past the closed gate. They can have different causes.
Choose the Correct Replacement Valve
Match the existing valve’s size, mounting pattern, and actuation type—not just its color or its location under the RV.
A 3-inch valve is common on black tank outlets in U.S. RVs, but size alone does not prove compatibility. Some assemblies combine black and gray valves in one fitting, and some use a remote cable or electric motor.
Check the following before ordering:
| Feature | What to verify | Why it matters |
|---|---|---|
| Valve size | Markings, part number, or manufacturer dimensions | Pipe size and valve fit must match |
| Mounting style | Replaceable center body, complete fitting, or integrated assembly | Not all valves come apart the same way |
| Bolt pattern and body thickness | Match the installed assembly | A mismatch can strain the flanges or prevent a seal |
| Actuation | Direct handle, remote cable, or electric motor | Each type has different installation needs |
| Seal design | Correct seals and installation instructions | Seal shape and placement can vary |
| Clearance | Space for the body, handle, and full gate travel | A valve must open and close without interference |
Photograph the old valve, its markings, the handle position, and the surrounding pipework. Use the RV’s parts information or the valve manufacturer’s documentation to confirm the replacement.
A new valve will not fix a cracked flange, distorted pipe, or broken support. Those defects need repair before the new valve goes in.

Tools, Supplies, and Safety Checks
Have the correct valve, seals, tools, and waste-containment supplies ready before loosening any bolts. Once the assembly is open, you should not need to leave it unattended to find parts.
Tools and supplies
- A compatible replacement valve and new matching seals
- Replacement hardware, if specified or supplied
- Wrenches or sockets that fit the existing bolts and nuts
- Chemical-resistant waterproof gloves suitable for sewage handling
- Eye protection and work clothes
- A shallow catch pan that fits under the valve
- Absorbent pads or disposable towels
- A light and inspection mirror
- Suitable supports for the adjacent drain pipes
- A dedicated sewer hose and a non-potable-water rinse hose
- Cleaning supplies compatible with the valve and nearby materials
- Valve lubricant only if the manufacturer calls for it
Do not choose a wrench size or tightening torque from a generic guide. Hardware and torque requirements vary by assembly.
Set up a safe work area
Park on firm, level ground, apply the parking brake, and chock the wheels. Do not work beneath an RV supported only by a jack or by stabilizers that are not rated for that purpose.
Keep children, pets, food, and drinking-water equipment away from the repair. Cover cuts, prevent splashes, and wash your hands with soap and water after removing gloves.
Confirm that the campground, storage facility, or property allows this work. Never discharge tank waste or contaminated rinse water onto the ground or into a storm drain.
Stop and seek qualified help if the tank cannot drain, the assembly is unsafe to reach, or the pipework needs structural repair.
How to Change a Black Tank Valve: Step by Step
Use this procedure only for an accessible, serviceable manual blade valve. The instructions supplied with the exact replacement valve take priority for seal placement, lubrication, assembly, and tightening.
1. Empty the black and gray tanks
At an approved disposal connection, attach and secure the sewer hose. Empty the black tank first, then the gray tank, following the RV manufacturer’s instructions.
If the RV has a built-in black tank rinse system, follow its instructions exactly. Do not assume the rinse inlet prevents overfilling, and do not leave the rinse running unattended.
Keep fresh-water equipment separate from sewer equipment.
If the black tank will not drain, stop here. Do not loosen the valve to find out whether the tank is full.
2. Let the drain line finish emptying
Allow the outlet piping to drain after the tanks have emptied. Shut off the rinse water and close the valves once the system has finished draining.
Even an “empty” system can hold liquid in low spots, fittings, and the space between valves. Disconnect the sewer hose carefully and place the catch pan beneath the valve before opening the assembly.
Do not rely on tank monitor lights as proof that the tank is empty.
3. Photograph the valve and support the pipes
Record how the old valve sits between the flanges. Note the handle direction, bolt positions, nearby brackets, and available clearance.
Support the adjoining pipes so their weight will not hang from the tank outlet when the valve comes out. The supports should hold the assembly in its normal position, not lift or twist it.
For cable-operated or electric valves, use the specific service procedure. Isolate electrical power as directed before servicing an electric actuator.
4. Remove the mounting bolts
Loosen the bolts gradually, alternating around the assembly. Hold the opposite nut or bolt head as needed so the hardware does not twist the flange.
Remove the hardware while keeping the valve supported over the catch pan. Expect contaminated drips even after a thorough rinse.
If corrosion prevents removal or a fitting begins to crack, stop rather than applying more force.
5. Remove the old valve and seals
Separate the flanges only far enough to release the valve. Avoid using a screwdriver as a lever against plastic sealing surfaces.
If the valve will not come out without substantial force, check for another support or connection that restricts movement. Do not bend rigid plumbing to create clearance.
Remove both old seals. Depending on the design, they may stay on the valve or remain in the flange recesses.
6. Clean and inspect the sealing surfaces
Remove residue from the flange faces and seal seats with a compatible cleaner and a non-damaging cloth or tool. Avoid gouging the plastic.
Inspect for:
- Cracks around the flange or bolt holes
- Chips or deep scratches where the seals sit
- Warped or uneven flange faces
- Misaligned pipes
- Broken supports or signs of stress at the tank outlet
If the flanges cannot sit parallel without force, correct the alignment before installing the new valve. The bolts should clamp an aligned assembly—not pull bent plumbing into place.
7. Fit the new seals and valve
Install the new seals in the locations and orientation specified by the valve manufacturer. Do not assume every brand uses the same seal arrangement.
Use only a compatible lubricant if the instructions call for one. Do not add petroleum grease, sealant, or adhesive unless the manufacturer specifically approves it.
Place the valve between the flanges without rolling, pinching, or dislodging either seal. Position the gate and handle as directed by the installation instructions.
8. Install and tighten the hardware evenly
Start all bolts by hand before tightening any one corner. Confirm that the valve sits squarely and the seals remain in place.
Tighten in a crossing pattern, in small stages. Use the specified torque if one is provided.
Do not apply extra force simply because the joint is plastic or still appears to have a gap. Overtightening can distort the assembly and cause the leak you are trying to prevent.
9. Check valve travel and pipe support
Move the handle through its full travel. The gate should open and close without binding, although new seals may create some resistance.
If the handle becomes much harder to move after tightening, stop. Recheck the seal position, flange alignment, and tightening procedure.
Restore any required pipe supports before testing with water.
Test the New Valve Before Using the Toilet
Test for both external leakage and seepage past the closed gate. A dry valve body alone does not prove that the gate seals.
Perform the test where all discharge can go into an approved sewer connection. Keep the sewer hose attached and secured during draining and outlet checks.
- Close the new black tank valve. Keep the gray tank empty and its valve closed so it does not confuse the result.
- Add clean water through the toilet. Use enough to cover the tank outlet and place water against the closed valve, without approaching an overflow condition.
- Inspect the outside of the assembly. Dry the joint first, then look for fresh moisture around the flanges, bolts, and valve body.
- Check for flow past the closed gate. After residual water in the shared outlet has cleared, continued flow may indicate gate seepage.
- Open the valve and drain. Confirm that the handle travels fully and water flows through the secured sewer hose.
- Close and check again. Recheck the joint and outlet before returning the toilet to service.
Although you added clean water, the tank and drain system remain contaminated. Handle the test discharge as wastewater.
A successful repair has a dry exterior, full valve travel, and no continuing seepage past the closed gate after residual drainage clears. If you cannot clearly see or verify the result, arrange a service inspection rather than assuming the repair worked.

What to Do If the New Black Tank Valve Leaks
Find where the water comes from before tightening or replacing anything else. Different leak locations point to different faults.
| Problem after installation | Likely checks | Corrective action |
|---|---|---|
| Leak between the valve and flange | Pinched seal, debris, incorrect seal, or uneven assembly | Empty the tank, disassemble, inspect, and refit correctly |
| Water passes through the closed gate | Debris at the blade, damaged seal, wrong part, or incomplete closure | Confirm full travel and part compatibility; service only after draining |
| Handle binds after tightening | Distorted body, misaligned flanges, or displaced seal | Drain and recheck alignment and assembly |
| Leak comes from the pipe or tank connection | Crack, damaged joint, or unsupported plumbing | Repair the plumbing; another valve will not solve it |
| Moisture appears only at the sewer hose | Hose gasket or outlet connection fault | Repair that connection separately |
Do not try to stop a persistent leak by tightening the bolts harder and harder. That can damage the valve body or flanges.
For a stuck cable valve, the fault may be in the cable, its routing, or its attachment rather than in the gate. For an electric valve, use the manufacturer’s diagnostic procedure before replacing the valve body.
Common Mistakes and When to Call an RV Technician
The most serious mistake is opening a valve assembly that still holds back sewage. Other common errors involve mismatched parts, damaged seals, or stress on the plumbing.
Avoid these shortcuts:
- Reusing worn seals with a new valve
- Assuming all nominal 3-inch valves are interchangeable
- Forcing the flanges apart
- Using unapproved grease or sealant
- Tightening one corner fully before the others
- Leaving drain pipes unsupported
- Testing only for an external leak
- Treating an outlet cap as a repair for a leaking gate
A technician is the better choice when the tank will not empty, the valve is difficult to access safely, or the tank outlet is cracked. Professional help is also appropriate when the repair involves glued fittings, extensive underbelly removal, or unfamiliar electrical controls.
An add-on outlet valve may provide temporary containment in some systems, but it does not repair the original valve. It can also leave trapped sewage between valves. Do not treat that arrangement as proof that the original assembly is safe to remove.
FAQs
Can I replace only the black tank valve seals?
Sometimes. If the valve body, blade, and actuator are sound, a manufacturer-approved seal kit may address a seal fault. Cracks, blade damage, or a worn actuator may require a complete valve instead.
Can I change the valve while the RV is parked at a campsite?
Only if the site permits repairs and you can contain and dispose of all wastewater properly. A full-hookup site does not automatically authorize opening sewage plumbing.
Should I leave the black tank valve open after replacing it?
Generally, keep it closed between dumps unless the RV manufacturer specifies otherwise. Leaving it open can let liquid drain away while solids remain in the tank. Add water and manage the tank according to the RV’s operating instructions.
Does the black tank valve need regular lubrication?
That depends on the valve. Use only the product and method approved for the exact assembly; some products sold for tank treatment are not substitutes for direct valve service. Follow the manufacturer’s maintenance schedule rather than adding household oil or grease.
Evidence, Source Limits, and Next-Question Gap Map
This guide is a general repair procedure, not a model-specific service manual or a report of hands-on testing. Live browsing was not available, so current competitor pages, search results, and individual valve manuals were not inspected. Compatibility, seal orientation, lubricant approval, and torque must therefore be confirmed for the actual part.
Useful primary-source starting points include:
- Valterra for documentation and support for its waste valves.
- Lippert Support for documentation applicable to supported RV components.
- CDC for public-health guidance on hygiene and exposure to human waste.
The following questions are inferred from the repair process, not claimed search-volume findings.
| Next question | Reader stage and basis | Competitor coverage | Reader benefit and answer basis | Priority and placement |
|---|---|---|---|---|
| What if the tank will not drain? | Before repair; inferred safety need | Not checked | Prevents opening a loaded tank; requires safe drainage or qualified service | High; safety checks and Step 1 |
| How can I tell gate seepage from residual outlet water? | After repair; inferred diagnostic need | Not checked | Avoids a false pass or false failure; test each tank separately after residual drainage clears | High; leak test |
| What if the flanges will not separate or align? | During repair; inferred access constraint | Not checked | Helps prevent cracked plumbing; inspect supports and use model-specific service guidance | High; Steps 5–6 |
No site map was supplied, so no parent or neighboring pages have been assumed. This article serves as a standalone procedural guide.
Conclusion
To replace an RV black tank valve, start with an emptied tank, a verified replacement part, and a safe way to contain wastewater. Support the pipes, protect the sealing surfaces, install new seals correctly, and tighten the assembly according to its instructions.
Before using the toilet again, confirm full valve travel, a dry exterior, and no continuing seepage past the closed gate. If the tank will not drain or the plumbing needs force to fit, stop and have an RV technician resolve the underlying problem.